
Guide to Acoustic Guitar Through Saddles
Does your guitar saddle go all the way through the bridge so that you can see the edges on either side? This is less common on acoustic guitars made since 1965, but is known as a through saddle, although you will also see the terms “cutthrough saddle” or “long saddle” as well.
Through saddles are often associated with Martins built from around 1916 to 1965, but several other builders have used through saddles on some models and series, including some Blueridge Prewar models, Collings (called “cutthrough” on Collings site), Eastman, Gibson, Huss and Dalton, and Waterloo.
Although a number of notable guitar builders have used through saddles, no universal through saddle size exists, even for the same manufacturer. Most notably, Martin has used a variety of different through saddle sizes, installation types, and materials.
Additionally, a lot of the through saddles for sale online are blanks that, although they may have the correct radius and approximate length, the thickness, height, bass to treble height will likely need adjusting to your specific guitar. Additionally, the top often needs profiling, and the edges and wings need to be adjusted to be flush with the bridge.
This article walks you through the steps to find a through saddle replacement for your acoustic guitar. Please note that adjusting a through saddle is difficult and time-consuming. Most guitar owners should take their guitars to qualified guitar technicians for replacement instead of attempting DIY through saddle removal and/or installation.
Through Saddle Parts
Before we get into the steps for finding a saddle, let’s review the main parts of a through saddle. The below image shows the key parts of a through saddle, followed by notes on each.
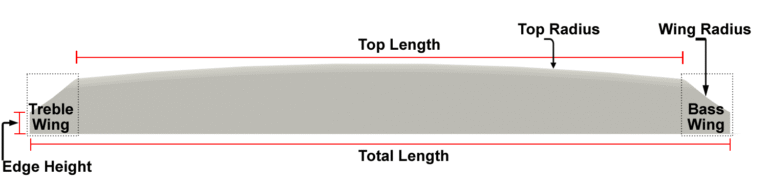
- Total Length – Length of saddle measured at the bottom.
- Top Length – Length of the radiused section from the bass to treble wing.
- Top Radius – Typically matches fretboard radius, but not always, and so you should measure your current saddle’s radius before ordering a replacement.
- Edge Height – Varies significantly depending on installation method.
- Treble Wing/Bass Wing – You may also see these referred to as “shoulders.”
- Wing Radius – Often a 1 inch radius
Step One: Determine Installation Method
While at first glance it might seem as though only one installation method exists for through saddles, there are three separate installation methods: Cut Through, Drop In Through, or Wings on Top. Let’s review each.
Cut Through Installation
Through saddles will often be of this variety, and if your guitar was built during the twentieth century, very likely this type. The bridge itself was cut through over a low sitting saw blade, rather than a pocket cut with a router. The saddle was then installed, and often, but not always, glued in place.
Many saddles were installed and glued into the bridge slot before the bridge itself was fit on the guitar. Please see the below picture as an example.

This Martin factory bridge/saddle combination has a Micarta saddle glued in and the wings adjusted. The top is flat and, after the bridge would be installed on the guitar, the technician would add top radius, profile, and adjust for height via the top.
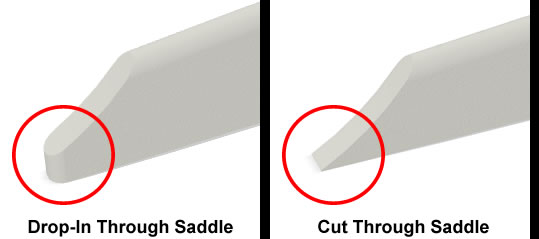
Cut through saddles are often easily identified by the edges, which are typically flat, as shown in the below image.
Martins built from around 1916 to 1965 often have cut through installation saddles. In the 1990s, Martin began making some models with cut through installation again. For example, pre-2003 Vintage Series Martins had cut through Micarta saddles that were glued in.
Many Martin Authentic, Marquis, and Golden Era models also have through saddles glued in similar to how 1916-65 Martins have.
Drop In Through Installation (Fake Through Saddle Version 1)
Once installed, this installation type looks similar to the cut through installation listed above. However, the drop in through saddle uses a routed slot with a drop in installation saddle. Note that drop in installation does not mean that these saddles are one-size-fits all. If you purchase a new drop in through saddle, you will still need to adjust it to your specific guitar’s saddle slot, including length, thickness, height, bass to treble height difference, edge height, and may also need to adjust other aspects such as the wings or compensation. A drop in through saddle is easily removed because they are not glued. However, a drop in through saddle is about as difficult to install as a cut through saddle is.
The routed slot extends through the bridge, and the wings are sanded flush with the bridge to provide a simulated look of a through saddle. This allows for use with an undersaddle pickup ribbon.
This installation method is sometimes called a “fake through saddle” since the saddle slot does not actually go all the way through the bridge.
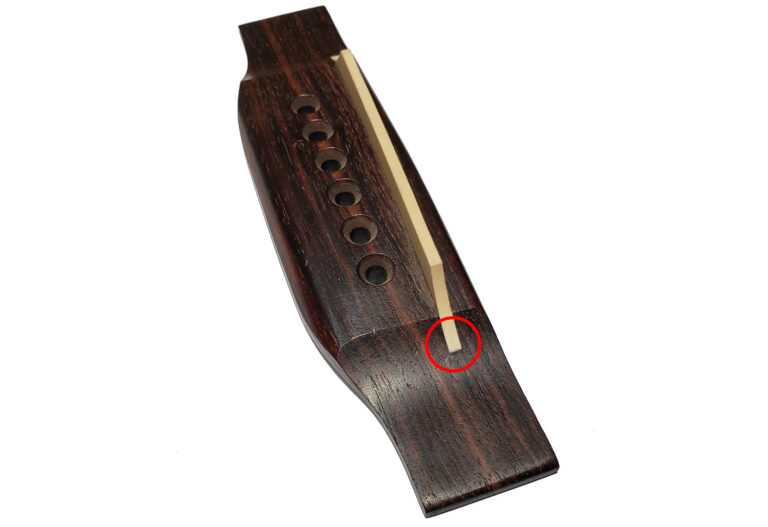
For Martin models, the drop in through saddles are easily identified by looking at the edges, which will be rounded and have a bit of height to fit in the slot, similar to other drop-in saddle ends. Conversely, cut through saddles will have flat ends with very little height, particularly when removed, as shown in the image below.
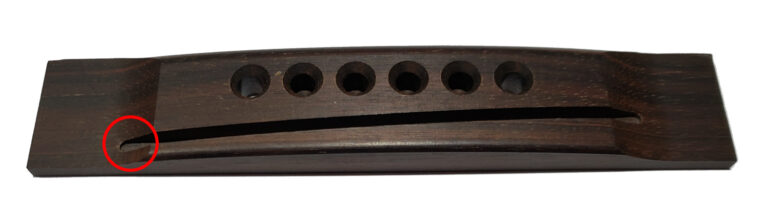
Similarly, the bridge saddle slot will be routed, rather than saw cut, and identifiable by the routed slot with rounded edges as shown in the below image.
Vintage Series Martins have used drop in through saddles since 2003.
Wings on Top Installation (Fake Through Saddle Version 2)
Although we don’t know of any guitar builders that do this from the factory, your through saddle might be a wings on top installation, also called a “fake through saddle,” although a different variety. This may have been installed later by a guitar technician. This saddle type uses a shorter total length, and the wings sit on top of the bridge.
Step Two: Determine Compensation Pattern
It might seem as though all through saddles are non-compensated, but some will have compensation, often done during installation, that may be unique to the guitar. Please see the end of this article for information on installation and compensation.
Additionally, non-compensated saddles come in three different varieties – center line, forward line, or diagonal line. Through saddles are often center line non-compensated. Please see our Guide to Non-Compensated Saddles for more information.
Note that you will find some through saddles listed as “shaped.” This typically means that the top radius has been cut, but the top has not been compensated or profiled.
You will also find some through saddle options listed as compensated or “intonated,” but please note increased compensation does not necessarily mean improved intonation, and could make your intonation worse. In deciding to shift from a center line non-compensated saddle to a compensated saddle, you will first need to check your guitar’s intonation, then determine how different compensation patterns will affect it.
Let’s look at four different compensation patterns used on through saddles and discuss how each will affect intonation. These images look at the saddles from the top. All have a three degree bridge saddle slot angle. The thin blue line shows the approximate spot each string will rest on the saddle.
Center Line Non-Compensated
First, let’s look at center line non-compensated, which is common on through saddles.
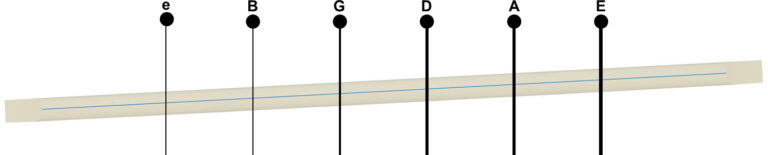
With this compensation pattern, all strings sit in the center, and the saddle slot angle serves as the only form of string compensation. Note that your saddle might be a forward line non-compensated saddle, in which the strings all sit forward.
A common problem with this pattern is that the B string is sharp. As such, many customers look for a saddle with a B string compensated back toward the bridge pins to extend the B string’s scale length. However, ensure that you distinguish between center line B compensated and forward line B compensated, both discussed next.
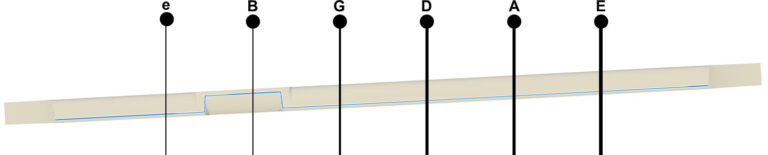
Center Line B Compensated
The below image shows where the strings sit on a center line B compensated saddle.

You can see that only the B string has been adjusted versus the center line non-compensated pattern. If you currently have a center line non-compensated saddle, and intonation is fine but your B string is sharp, consider this saddle type. Please note that this will not necessarily correct your B string from being sharp, but might help by lengthening the scale length slightly.
Forward Line B Compensated
Now let’s look at forward line B compensated.
You can see that versus the center line non-compensated, the forward line B compensated moves the B back, and all other strings forward. If you currently have a forward line non-compensated saddle and your B string is sharp, then this might be a good option. However, if you have a center line non-compensated saddle and your B string is sharp, then this might assist with your sharp B string, but could also negatively affect some or all of the other strings by shortening the scale length.
Forward GDA Wave Compensated
Another compensation pattern sometimes seen on through saddles is a forward GDA wave compensation pattern. Please note that different wave compensation patterns differ – please see our Guide to Wave Compensation Saddles for more information, and so before purchasing a replacement check to see what pattern your current saddle is.
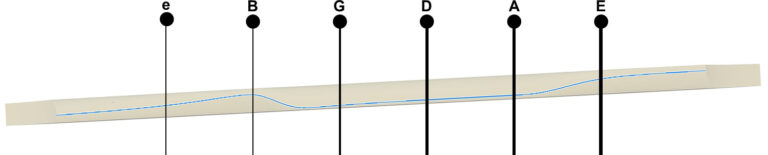
This saddle compensation type places the G, D, A strings all sit forward, while the treble e sits center, and the B and bass E sit backward. Relative to the center line non-compensated pattern, all strings except the treble e will sit differently, so check your current intonation and determine the effects of a forward GDA wave pattern before changing saddles.
Step Three: Measure Top and Wing Radii
We often advise that you match your saddle and fretboard radii for better playability, however, there are a number of exceptions to this.
Collings guitars are often made with a 14 to 26 inch compound radius. We advise that you contact Collings support and ask what your factory saddle’s radius was.
Martin guitars typically have a 16 inch fretboard radius, and saddles found online made for Martins will also typically have a 16 inch top radius. However, you will find some saddles designed for Martins online with a 20 inch top radius, as some Martins have apparently been made with a 20 inch radius saddle to match the bridge radius. We make our Martin style saddles with a 16 inch radius, but might be able to make to a different radius upon request.
You can printed radius gauges to determine your current saddle’s radius, or contact the manufacturer with your serial number.
Wing radii are often a one inch radius, but we advise that you measure this, too, or contact the guitar builder, before purchasing a replacement through saddle.
Step Four: Measure Saddle and Slot Length and Thickness
Through saddles come in a number of different lengths, even from the same builder. Notably, you will find a number of reference to the Martin “long saddle,” but there are different lengths for Martin through saddles. Please see our Guide to Martin Saddles for more information on Martin saddle lengths.
We also advise that you measure your saddle slot length and thickness, too, as you may need a saddle slightly longer and/or thicker than your current saddle.
Step Five: Determine Maximum Height, Bass/Treble Edge Height Difference, Edge Height
Acoustic guitar saddles often have a taller height on the bass side than on the treble for increased action height for the thicker bass strings. For many guitar brands, this bass/treble edge height difference is often around 1 mm, but for Martin guitars, this is often around 1.5 to 2 mm. Please see our article on How to Adjust Saddle Height on One Side More than the Other for more information.
Step Six: Determine Saddle Material
Through saddles often come in bone, but you will see some Micarta saddles, such as on some Martin models. You may see some Tusq saddles as well.
For information on tonal qualities of these materials, please see our article on What Is the Best Acoustic Guitar Saddle Material?
Step Seven: Removal and Installation
Please note that removing and installing a through saddle is difficult, and for most guitar owners, you should take your guitar to a qualified guitar technician rather than attempting DIY. For those who wish to tackle this project, please see the below links for DIY tips.
Frets.com – Removing a Martin Through Saddle
Acoustic Box – Safely Removing a Martin Guitar Through Saddle
How To Carve an Open Saddle Slot
Frets.com – Adjusting Saddle Height
How To Intonate a Flattop Guitar
Which Through Saddle Does Your Guitar Need?
Are you still wondering which through saddle your acoustic guitar needs? Please contact us with all of the below information.
• Guitar Year, Model, Series
• Current Saddle Total Length, Top Length, Maximum Height, Bass to Treble Height Difference, Thickness, Radius
• Guitar Saddle Slot Length, Thickness (if different from saddle specs)
• Wing Radius
• Edge Height
• Installation Method
• Current Saddle Compensation Pattern (please send a picture if you are not sure what type you have)
• String spacing at the bridge
We will respond within 48 hours.